------

Search This Blog

Showing posts with label Q&A. Show all posts

Sunday, December 25, 2022

Blue River Catch and Release Information | Questions and Answers | #fishing #flyfishing #blueriver

Question from the Texas Fishing Forum that we follow...

"Now I have some questions on the Blue River in Oklahoma. I am a bit out of that loop.

1) That parking on the E side of the Catch and Release (off 7) - is that just for parking, and there is still a hike up to the high point of the C-n-R?

2) I think the C-n-R is barbless? Kind of silly if you ask me, but my memory banks are full!

3) Are the stockings good in the C-n-R area? Still a mystery easter egg hunt?

Anybody been there lately?"


Answering the mail, we provide the following:

"1) That parking on the E side of the Catch and Release (off 7) - is that just for parking, and there is still a hike up to the high point of the C-n-R?"

The parking on the East side off Hwy 7 is just for parking.  It is designated as a walk-in area only and no camping.

Refer to Blue River Map below.

It is a 2+ mile hike to the Catch and Release area from the parking area on the East side of Hwy 7. For a shorter hike - about 1.3 miles, enter at the parking area furthest West of Hwy 7.

Parking Area Furthest West from Hwy 7


"2) I think the C-n-R is barbless? Kind of silly if you ask me, but my memory banks are full!"

The Catch and Release area is barbless.  See excerpt below:

Retrieved from https://www.wildlifedepartment.com/fishing/regs/trout-area-information


"3) Are the stockings good in the C-n-R area? Still a mystery Easter egg hunt?"

Changes each Season with larger trout noted in past stockings. For this Season, have been monitoring reports that indicate sizeable trout in the area. Picture below was posted 6 days ago.

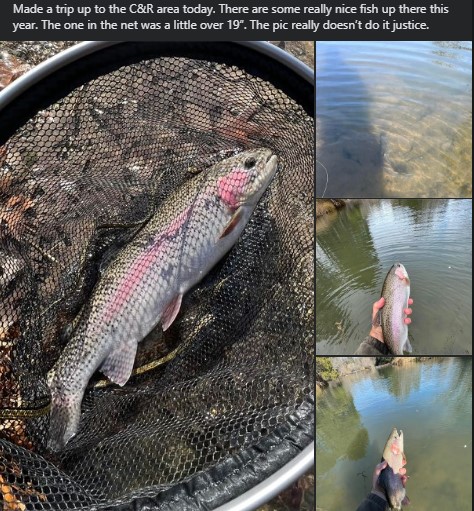
19" Rainbow Trout - Blue River C-n-R


For more details, here are videos that may be of interest for anyone wanting to fish the Blue River Catch and Release Area:

First trip to the C-n-R, taking the "long route"...

Blue River's catch and release section was stocked recently. Gave it a try, ended up doing a lot of walking and scouting the river. First time fishing the C&R section. Trout are there, next round... plan to take a shorter path and do less walking and more fishing!

Was able to fish with the OPST Commando Head on the 9' 5wt. Does cast well in tight areas... roll casting and switch casting to where the fish were lurking was easily done!


Next trip to the C-n-R, taking the "shorter route"...

Headed back to Texas from Oklahoma City, decided to make one more stop at the Blue River Catch and Release area. Caught one, lost a number of others... still had a great time! Plus: Learned the parking area furthest west is best for accessing the C&R.


Detailed video of the C-n-R with key points noted in the video timeline:

Fished the Blue River in Oklahoma last Saturday - November 7. Plan was to fish the Hughes Crossing area for trout to make another catch and cook. Struck out though. That said, made the run North of HWY 7 and fished the Catch and Release Section. After a wrong turn or two, made it to the area and had a fun time catching, losing, and landing a trout or two.

Did see an armadillo on the walk back to the parking area, and stopped by the Fly Library to add a fishing fly or two to collection. Overall, a great time on the Blue River!


PS: Longer than normal video, have key points noted in the video for reference.
  • Hughes Crossing: 1:06
  • Walking In to the C&R: 2:09
  • Fly Library Stop Inbound: 2:57
  • Fishing the C&R: 4:49
  • First Trout Caught: 6:52
  • Fishing and Missing Trout: 10:49
  • View of Retrieve Used: 17:20
  • Walking Out of the C&R: 18:29
  • Armadillo: 18:50
  • Lesson Learned - Go Left not Right: 19:54
  • FYI - Post Marker: 20:21
  • FYI - Go Right not Left: 22:37
  • Fly Library Stop Outbound: 21:26


 How I Check My Hook is Barbless?:

Ever wonder if your hook is barbless when fishing an area that requires it? Try this fishing tip!


Blue River Map

Retrieved from https://www.wildlifedepartment.com/fishing/regs/trout-area-information


Saturday, February 05, 2022

No Welded Loop in Your Fly Line... Try These Methods! [+ Tippet Rings]

No Welded Loop, No Problem

When your fly line does not come with a welded loop, what options do you have to attach your leader to your fly line?

Below are four methods we have tried; all will work but there is one in particular that we like.

Do read on!


Braided Loop

The first method uses a braided loop - specifically, Rio Braided Loops.

The Fly Line is inserted into one end of the Braided Loop. Super Glue is then applied to the connection, and then a plastic sleeve is slipped over the connection.

Other brands use a heat shrink tube instead of the plastic sleeve, but the concept is the same.

We have tried this method with several of our fly lines and have had no issues with exception of convenience.

That is, more often than not we are either out of braided loops or forgot where we put them.

The latter being the case for one particular Field Team Member who we will leave un-named.


DIY Loop

The next method calls for making your own fly line loop. There are different techniques to make a fly line loop. Some are elaborate and others are not so elaborate.

In our case, it's not so elaborate...
  • Form a loop at the end of the fly line,
  • Super Glue the tag end to the fly line,
  • Wrap with fly tying Dacron thread or dental floss
  • Next, Super Glue the thread or floss,
  • And then, apply Head Cement or Tough as Nails Clear Nail Polish.
  • Let dry, and then go fishing!

This method worked for us also. The largest fish caught with this connection was a 26" Striped Bass. 

However, we noticed our fly line to tippet connection fails first since its connection is a lighter pound test strength compared to the DIY Loop.


Nail Knot

This method is the first one yours truly learned when he first started fly fishing.

No YouTube or Google back then; it was the County Public Library and fly fishing books that described fly lines made of silk and tippets made of horse hair!

More important, the books instructed a "Newbie" like me to attach my leader to the fly line using a Nail Knot.

The Nail Knot called for wrapping the leader around a nail, slipping the leader or more like surgically weaving it under the wraps, and then finally removing the nail and pulling tight.

That said, I stepped up my fly fishing game when I bought a Nail Knot Tying Tool to replace the nail.

In short order, I could quickly replace a leader using the tool even while in the field fishing a river!

Simple and quick to tie. Some fisherman add a little Super Glue to the knot for extra insurance.

But, I tend to pull the knot tight and then leave it "as is". I still use this method but only when I have the Knot Tying Tool. I can still tie the knot using a nail, but it takes me much longer than with the tool.

Luckily, I keep the Knot Tying Tool in my fly vest. However, I am thinking about replacing it with the combination nipper and knot tying tool as I have recently misplaced by nippers!


Nail Knot Variant

The fourth method is a variant of the traditional Nail Knot that yours truly learned years ago.

The variation from the Nail Knot method is that the leader is not tied directly to the fly line.

Instead, we take an 18" section of 30lbs mono-filament, and tie one end to the fly line with a Nail Knot.

And then, we make a loop in the other end using a Perfection Loop Knot.

Once everything is pulled tight, we attach our leader to our fly line using the loop on our leader to the loop of the 18" section of monofilament.

Like when we use a Braided Loop or a DIY Loop, the Nail Knot Variant allows quick and easy change out of  leaders.

Plus it saves us from cutting the fly line and retying the Nail Knot.


+Tippet Rings

With the leader attached to our fly line, we normally use a barrel knot aka blood knot to connect our leader to the tippet.

However, we learned about Tippet Rings one season, and we have since added them to our fly fishing list of "really nice to haves".

Using a Trilene Knot or an Improved Clinch Knot, we attach the Tippet Ring to the leader.

Then, using the same Trilene Knot or Improved Clinch Knot, we attach the tippet to the Tippet Ring.

In short order, we can replace tippets as quick as we can tie a knot. And, in some Seasons, we have not replaced a leader which definitely saves a buck or two given the cost of fly leaders!

Do give them a try! Just be sure to leave the Tippet Ring on the snap swivel while attaching it to your leader, and then take it off the swivel. Else, you may have a hard time otherwise as the rings are small, really small!


Final Thoughts... One Method In Particular!

Although there are other ways to accomplish what we described above, we seem to keep using these connections year in and year out. Moreover, we have been using the Nail Knot Variant more often lately since...

We ran out of Braided Loops; are too lazy as well as impatient to make a DIY Loop (gotta glue, then wrap, then let it dry,... by then, we could have gone fishing already); and tying the Nail Knot is quick especially with a Nail Knot Tying Tool but we hate to cut off a piece of expensive Fly Line every time we change Leaders!

All for now and Good Luck and Good Fishing!


"Don't Cut Your Fly Line. Please!"

COAF Field Team YouTube Channel


Tuesday, June 30, 2020

TPWD Answers Our Question about Shad!

We like using Shad for bait but at times cannot purchase them because the local bait store is out of stock. This is why we like to catch our own plus it saves us money – cost of the cast net and time and effort to catch them, etc…

However, due to restrictions related to aquatic invasive species and the transfer from one body of water to another, we have followed Texas Parks and Wildlife Department’s (TPWD) regulations that limit using Shad for bait to the same body of water where they were caught.

Our understanding was the same body of water limitation was for live, fresh, and frozen shad. For clarification, we contacted Texas Parks and Wildlife Department via their online “Submit a Question” form.


The question we asked and the answer provided are shown in the picture below!


Looks like we can catch Shad from one lake, remove any of the water with the fish, using a net to move the fish from one container to another so no water is transferred from lake to lake!

PS: We did not ask about transferring live Shad as we prefer to limit using live Shad to the body of water we caught them from to avoid the risk of transferring aquatic invasive species.

Popular Posts

Copyright 2024 - CityOfAllenFishing.Blogspot.Com

Contact Us: COAF.Weblog@Live.Com